
When a failure occurs in an irrigation system, the controller commonly gets blamed as the culprit. But the problem may not lie with the controller.
If you’re having problems with your system and are unsure of the cause, these electrical troubleshooting tips could help you discover if the controller is the issue or something else.
Look for the obvious
Start with the quick and easy stuff. Is the water supply turned on? It could be turned on partially, or the valve could be broken, so check for this first. If the system includes a rain sensor, inspect that next. The sensor may have shut off the system due to a rain event, or the sensor could be faulty.
Next, take a look at the controller. Is there power to your controller? First confirm that you have line voltage coming in. Most controllers have a battery backup, meaning you could still have a working display without line voltage. You can confirm this by removing the battery.
Test the transformer
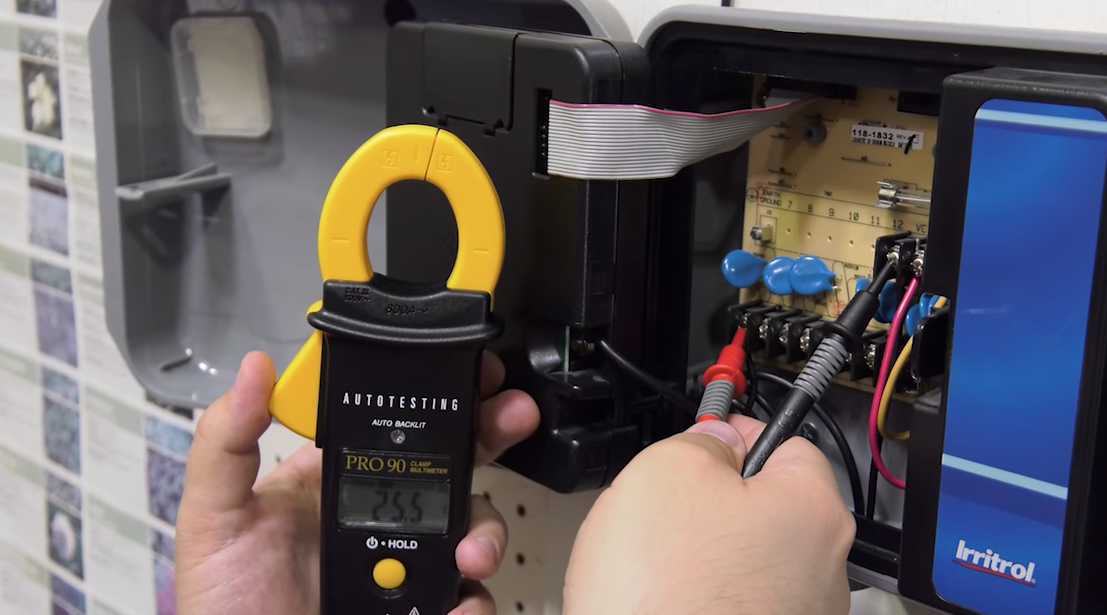
Now it’s time to test the controller, starting with the transformer. This is where a good multimeter, like the Pro90 Armada Automatic Clamp Multimeter or Pro30 Armada Digital Volt Ohm Multimeter, comes in handy. Set the multimeter at 200 VAC (volts, alternating current), then touch the probe leads to the output side of the transformer.
The transformer should put out 19 – 30 VAC. If not, verify that the incoming voltage is around 110-120 VAC in order to determine if the problem is actually in the transformer.
Test the stations and valves
After that, check the terminal strip to see if it has power. Turn on the stations one by one, and test whether each is receiving proper voltage. Turn your multimeter to 200 VAC and touch one lead to the common terminal and one to the zone terminal. The reading should be 19 – 30 VAC. If the readings are good to this point then the problem lies in the field and not the controller.
Next, measure the ohms on the terminal strip to each valve. First check that the power is turned off by disconnecting the field wires. This helps ensure an accurate measurement, and live power to the valves could damage your multimeter when measuring ohms.
To test the valves, disconnect the common terminal from the terminal strip. Touch one lead to the common terminal, and the other to the zone you want to test. You should get a reading of 20 – 60 ohms.
If the reading is above 60, you could have a weak connection or open circuit; a reading below 10 indicates a short. An open circuit or short at the clock means you’ll need to test the valve’s solenoid.
Test the solenoids at the valves and the wire path
To test the valve’s solenoids, the Pro48 Armada Irrigation Station Tester activates the solenoids to test, verify and identify clock 24v power output and open and shorted wiring.
You can pick up a Pro48K Armada Irrigation Station Test Kit to get everything you need. This kit includes the testing tool, a Pro 210F Tone Probe & Pro48 Solenoid Activator and a Pro21 Carrying Case.
Disconnect the wires from the valve, and check the solenoid the same way you checked the terminal strip. If the solenoid is good, then it’s possible that your wire or wire connections are bad.
Make sure the controller is set up correctly
If the system’s functionality is all working properly inspect the controller’s programming as one last check. First make sure the zone has a run time and a start time. A common feature in newer controllers allows for the master valve to be turned on or off for each zone, so remember to check for this, as well.
If your controller passes all of these checks, then the controller is likely not what’s causing the issue and you will need to do additional system troubleshooting to find the problem.
To learn more about irrigation troubleshooting, visit your local Ewing store. Or watch this Ewing video about how you can use a multimeter to troubleshoot your irrigation system:

