

The phrase “time is money,” coined by Founding Father Benjamin Franklin, has become a well-understood and appreciated piece of advice in American culture. In modern day USA, the workplace beckons employees to complete as many tasks as possible during the workweek. While the drive to accomplish things can be helpful, if one is not properly prepared for the tasks at hand, what feels like efficient work can end up costing additional time (and money!) if a project needs to be redone.
Below are three common mistakes made when installing dripline, along with ways you can avoid them.
Mistake #1: Assuming You have “Clean” Water
“Diligence is the mother of good luck.” –Benjamin Franklin
Even water termed “clean” can have a negative impact on dripline long term because factors can change over time. All too often, dripline is installed without a filter on the premise of the water source being “clean.” 
Jeffrey Knight, Ewing’s Director of Education Services, suggests that when working with drip, one should always use a filter.
“Clean water today does not mean clean water tomorrow,” Knight said. “Emitters have tiny pathways and orifices that are easily clogged. Lines can break and become compromised. Taking time to install a filter to be used with your dripline is a small investment that can potentially save an entire system.”
While we can’t promise you installing a filter will bring you good luck, we can tell you that your diligence in taking the extra step to install one, despite the water source, will be a worthwhile investment.
Mistake #2: Not Determining The Soil Type
“Take time for all things. Great haste makes waste.” –Benjamin Franklin
Determining what kind of soil type you are working with is hugely important when installing drip—but many contractors forget or skip this step.
“Soil type is the number one consideration in determining dripline emitter gallonage, emitter spacing and dripline spacing,” Steve McCarter, National Public Agency and Specification Sales Manager for Ewing, said. “Dripline zones should be designed to match both plant water requirements and soil infiltration rates.”
When soil types are not properly evaluated, a large risk develops for installing the wrong kind of emitter on the dripline. The chart below is a great reference for what kinds of emitters work best with specific soil types. To avoid making this mistake, plan this step into your drip installation timeline and figure out what kind of soil you are working with before you place the dripline. 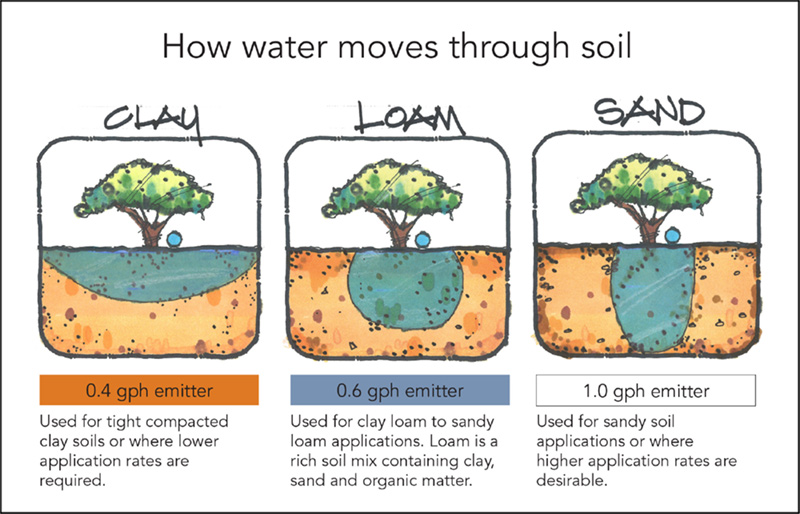 Mistake #3: Not Planning for the Future
“By failing to prepare, you are preparing to fail.” –Benjamin Franklin
Oftentimes during an installation only one drip ring is put down for a plant. While it may be enough for the first year or two, plants grow and expand and in no time at all, one drip ring can’t provide an adequate amount of water for the plants needs.
Thankfully this mistake has an easy fix. Simply place multiple drip rings around the plant. Preparing your dripline for the future will increase its longevity and the lifespan of the plant the drip is watering.
If you have a project where drip was installed and not prepped for a plant to expand, watch this video for a solution on how to expand the dripline.
Many contractors may know how to install dripline, but taking precautions to avoid common mistakes like the ones mentioned above is an easy way to make your service stand out from the competition. In the long run, it will also save you time and money, and no matter how small the savings, “a penny saved is a penny earned.”

